Smart Dentin Grinder

What is the Smart Dentin Grinder?
As you are aware, autogenous graft (patients own bone) is the gold standard of grafting. So why do more dentists not use autogenous grafts today? Because it has never really been practical to implement into your practice due to the need for another surgical site from the patient. The Smart Dentin Grinder has changed this.
The Smart Dentin Grinder from GoldenDent is an innovative solution to practically create autogenous dentin graft from extracted teeth. It allows you to convert extracted teeth into bacteria-free particulate dentin ready for use in minutes.
Most Innovative Product of the Year 2014 at ADF Paris

Readers' Choice for Top 50 Most Innovative Products by Dentistry Today Nov. 2015 Edition
Endorsed by Gordon Christensen's Clinicians Report Feb. 2016

Clinicians Report Best Products for 2017 Dec. 2016 Issue
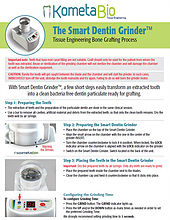
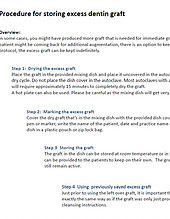
Step 1: Preparing the Teeth
- The extraction of teeth and the preparation of the particulate dentin are done in the same clinical session.
- Use a high-speed handpiece to remove all cavities, artificial material and debris from patient's extracted teeth, so that only the clean tooth remains. Dry the teeth well by air syringe. No need to decoronate or remove the enamel.
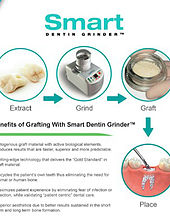
Step 2: Preparing the Smart Dentin Grinder
-
Lock in place the chamber on top of the Smart Dentin Grinder by:
Aligning the small arrow on the chamber with the one in the center of the grinder marked as 'INSERT'. - Turn the chamber counterclockwise to lock it in position. When locked, the LOCK Aligning indicator arrow on the chamber is aligned with the LOCK indicator on the grinder.
- Switch on the Smart Dentin Grinder. Switch located in the back of the unit.
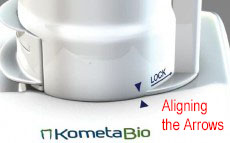
Step 3: Placing the Teeth in the Smart Dentin Grinder
Important: Dry the prepared teeth by air syringe. Only dry teeth are ready for processing.
- Place the prepared teeth inside the chamber next to the blades, up to 4 teeth at a time.
- Close the chamber cap and twist it counterclockwise so that it clicks into place.
Configuring the Grinding Time
To configure Grinding Time:
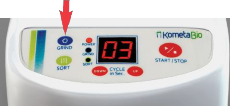
- Press the GRIND button. The GRIND indicator lights up.
- Press the UP or DOWN button as many times as needed in order to set the preferred Grinding Time.
We recommend setting grinding time to 3 seconds.
* Note: With the new Genesis Model, the grinder is pre-set and this step is not necessary.
Configuring the Sorting Time
To configure the Sorting time, in seconds:
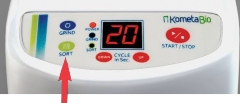
- Press the SORT button. The SORT indicator lights up.
- Press the UP or DOWN button as many times as needed in order to set the preferred Sorting Time.
We recommend setting sorting time to 10 seconds.
* Note: With the new Genesis Model, the grinder is pre-set and this step is not necessary.
Grinding and Sorting the Teeth
- Press the START button to start the grinding process.
- If large particles are left in the grinding chamber, press the START button again to grind for another 3 seconds and to sort for another 10 seconds. Be sure that no dentin particles are left in the top grinding chamber in order to maximize the output.

Step 4: Extracting the Chamber Drawers
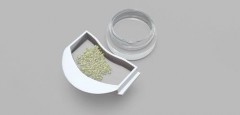
- Pull out/apart the top drawer compartment, which contains particles of between 300 - 1,200 microns.
- Bottom drawer containing particles smaller than 300 microns can be added as well in case more output volume is needed.

Step 5: Cleansing the Particles
- Transfer the contents of the top drawer compartment into one of the provided sterile containers (mixing dish).
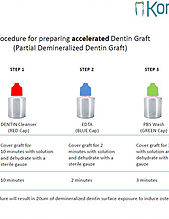
- Pour the provided DENTIN CLEANSER (RED CAP) into the container with the particulate. Fill to completely cover the particulate.
- Close the container's cap by turning it clockwise.
- Leave the particulate in the DENTIN CLEANSER solution for 5 minutes at room temperature.
- Using a sterile gauze, dehydrate the DENTIN CLEANSER solution.
- Pour Phosphate Buffered Saline (PBS - GREEN CAP) into the container to completely cover the particulate. Use a sterile instrument to mix the particulate and dehydrate using a new sterile gauze.
- REPEAT THE PREVIOUS STEP of the PBS only (GREEN CAP) TWICE (only the PBS solution should be repeated). Please use sufficient amount of PBS. This step is important in order to neutralize pH levels.
- The particulate dentin is ready for immediate grafting.
Optional:
- To dry the graft, place the open container with the wet particulate dentin in an Autoclave and run a Dry Cycle. Be careful, as the glass container will be hot! The dry graft should be covered, capped and labeled. Please refer to instructions for how to store dentin graft particulate.
Also, there is the healing time consideration. You will be able to complete the procedure in a shorter period of time, where you will not have to wait as long to complete the procedure due to the increased healing time.
In theory, do not change your best practices at first, but your experience will show you that with the Dentin graft you will be getting strong bone formation in about half the time of any other graft. The studies have found that the mandible site can be ready in as quick as seven (7) weeks and the maxillary site can be ready in three (3) months. This is much more efficient than the typical three (3) months for the mandible and six (6) months for the maxilla that most dentists would wait using an allograft or other non-autogenous graft.